Happy Wednesday crafty people! I hope you are having a fab week. I’m back today with my contribution to the Back to Basics and Beyond Challenge Blog which today has a new challenge to make a shaker card. I haven’t made any of these for a while (I must admit I find them a bit of a faff!) so I ad a rummage in my stash and dug out my acetate and and 3d sticky pads and got going.
There are lots of tutorials on youtube but I thought I would share how I put together my card in case it’s helpful!
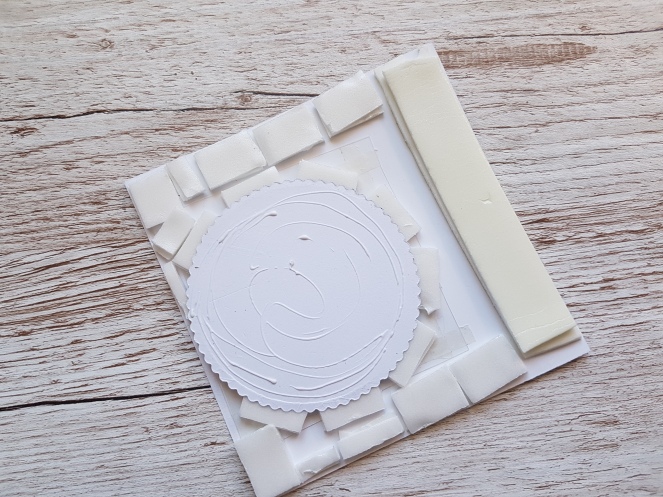
I started by cutting the front panel for my card and I cute a circle window for the shaker. I also cut a little scalloped frame to go around the front of the window to make it stand out a little more.
On the reverse I use some double sided tape to cover the window with some clear acetate. I used some from Dovecraft but you can also use some from packaging.

The next step I did was to add 3d pads around the window and around the edge of the panel. I did a double layer of 3d pads to give plenty of room for the sequins to move around. While I still have the 3d pads covered I take some fine powder (using the EK Powder tool) to swirl around the edge of the window. This just stops the sequins sticking to the sticky pads so they can move around when you shake the card.
I wouldn’t like to admit how many times I have forgotten to add the acetate until after I have added the sticky pads which is super annoying (have you ever tried to remove 3d pads? it’s not a fun job!!). Am I the only one?

Then I added some sequins, I like to use mini sequins but you can use different sizes and or little beads.

I had cut a circle of patterned paper for the background to the shaker window so I put this on top of the sequins and then added some wet glue to the back.
Now the sequins are safely secured so you can turn the panel over and stick it down to the card base.
To decorate the frint of my card I used a fairy die and stamp from Joanna Sheen. I think this die was a magazine gift and I love it. It’s fab for paper piecing so I gave my fairy some brown hair, pink mirror wings and an ombre dress with some stars on it. I heat embossed the sentiment in white and added it to the bottom corner.

I hope that you like my fairy card and I can’t wait to see all the shaker cards that my fellow design team members have come up with.

Do you have any tips to make shaker cards easy? I’d love to hear what you think and if you have entered the challenge give me a shout in the comments. Thanks so much for visiting Ginger Ninja Crafts.
Crafty hugs
Jenny (AKA the Ginger Ninja!) x

Very pretty, Jenny! My construction process is almost identical to yours.
LikeLiked by 1 person
Thanks Kathy, that’s good to know (although I kinda wish there was a super easy option that I’ve not thought of!!) xx
LikeLiked by 1 person
I know! Several companies do sell the plastic containers that fit behind specific dies for shakers. I don’t need to invest in something new, I already have the basic supplies to make it work. (and I don’t make many shakers, they are not mail friendly!)
LikeLiked by 1 person
that’s true, I’ve never tried those. Maybe someday! x
LikeLiked by 1 person
I love shaker cards. This is a great card and your fairy is lovely.
LikeLiked by 1 person
Thanks so much Golda x
LikeLike
Oh I love shaker cards! Your fairy is so pretty and your card is colorful and fun!! 🙂
LikeLiked by 1 person
Thanks so much Vicki xx
LikeLiked by 1 person
Beautiful shaker card, I love that fairy and the colorful design!
Tammy x
LikeLiked by 1 person
Thanks Tammy, it’s a gorgeous die and so nice to paper piece x
LikeLike
Fabulous card hun. I love the fact that you have the patience to do a tutorial too. Love Dawn x
LikeLiked by 1 person
Thanks Dawn xx
LikeLike
Brilliant shaker card Jenny, the fairy is a beauty and I think the background paper adds to the magical feel
LikeLiked by 1 person
Thanks Meg, she is a pretty fairy! x
LikeLike